
Why Aftermarket Motorcycle Fairings Crack at the Mounting Tabs
Riders buy aftermarket motorcycle fairings for the same two reasons: a fresh look, or replacement bodywork for a fraction of OEM prices. The panels usually look sharp and cost far less. Then a tab cracks, and it is the complaint you hear most often.
The weak point is almost always the fairing mounting tabs. These small, thin mounting points take all the vibration, flex, and shock of the road, and on many aftermarket panels they are molded thinner and weaker than the original factory pieces. That means a single rough pothole or an over-tightened bolt can spider-crack a tab and send a whole panel rattling loose.
What follows are the failure points, the materials that survive them, and the bracing you can add at home with basic tools. If you also need dependable hard parts and service to keep your machine road-ready, sourcing from reliable parts suppliers makes the whole build easier.
The Anatomy and Load-Bearing Role of Fairing Mounting Tabs
Fairing mounting tabs are the small, molded ears of plastic that stick out from the back of a fairing panel. They are the only real link between your bodywork and the motorcycle frame, and on aftermarket motorcycle fairings they are almost always the first part to fail.
[Diagram: a cutaway view of a fairing panel’s rear side, labeling the tab geometry, reinforcing rib, bolt passage, rubber grommet seat, and the contact points where the tab meets the frame. Arrows show the panel’s weight, vibration waves, and aerodynamic force.]
Where the Tabs Sit
They are hidden from the outside. Fairing mounting tabs run along the inner edges of a panel, usually near the nose cowl, side panels, and tail section. Each tab lines up with a matching hole or bracket on the frame, so the entire panel hangs on just a few small contact points.
Tab Geometry and Hardware
Most tabs are a short finger of ABS or fiberglass, a few millimeters thick and sometimes stiffened with a molded rib. A bolt or screw passes through a hole drilled in the tab, and a rubber grommet seated in that hole cushions the joint so the panel can flex instead of cracking. The grommet seat and washer spread the clamping force so the bolt does not tear straight through the plastic.
How the Tabs Carry Load
Each tab carries three loads at once: the weight of the panel pulling downward, engine and road vibration buzzing through the frame, and aerodynamic force pushing and pulling as you ride faster. Because those loads land on tiny contact points, stress builds where the tab meets the panel, not across the wide, flat face.
Why They Are the Weak Link
Thin plastic, sharp inside corners, and repeated heat cycles all create stress risers. Add over-tightened bolts or missing grommets and the tab cracks long before the rest of the fairing shows any wear. Once one breaks, a proper bracket and sourcing reliable replacement parts beat gluing plastic back together.

The arrows mark the forces working on each tab: the inward pull of an over-tightened fastener, the upward flex from airflow and road vibration, and the sideways shear that appears when a panel does not line up with the frame. Because all three converge at the tab root, that is where cracks begin – not out on the broad, flat face of the panel.
Comparing OEM and Aftermarket Fairing Material Construction
Two fairings can look identical from ten feet away and behave nothing alike in a driveway tip-over. The failure usually starts at the fairing mounting tabs, so construction is worth understanding before you buy or repair a panel.
OEM Fairings: Injection-Molded ABS
Factory bodywork from the major manufacturers is usually injection-molded ABS (acrylonitrile butadiene styrene). Molten plastic is forced into a steel mold at high pressure, which produces a consistent wall thickness – typically 2.5 to 3.5 mm – and tabs molded as one continuous piece with the panel, complete with reinforcing ribs and generous fillets. Tab, rib, and panel are all the same material, so stress spreads smoothly instead of concentrating at a single point. OEM fairings are built so the tab flexes with the panel rather than fighting it.
Aftermarket Injection-Molded ABS
Many aftermarket motorcycle fairings copy the OEM method and trim the cost. They are injection-molded ABS too, but wall thickness often drops to around 2 mm and ribs may be thinner or missing entirely. An OEM tab gives a little under load; an aftermarket tab under the same stress is stiffer and far more brittle. When you source durable replacement parts, checking tab construction rather than color match is what keeps bodywork in one piece.
Hand-Laid Fiberglass
Fiberglass fairings are built by laying resin-soaked cloth into an open mold, so thickness swings from 3 to 5 mm depending on how many layers the builder uses. The laminate is strong across the panel, but the tabs are frequently bonded on afterward with resin paste. That bond is the weak joint, and it cracks the moment a bolt is over-torqued.
Polypropylene Blends
Polypropylene (PP) blends are flexible, tough, and resist fatigue better than ABS. The trade-off is that PP is difficult to bond and paint, and its soft, bendy tabs can deform under vibration instead of holding a firm, repeatable clamping load.
Why These Differences Crack Tabs
Tab cracking comes down to three variables: material brittleness, wall thickness, and how the tab is molded. Thinner walls flex less predictably, and bonded or under-ribbed tabs have no path to spread stress.
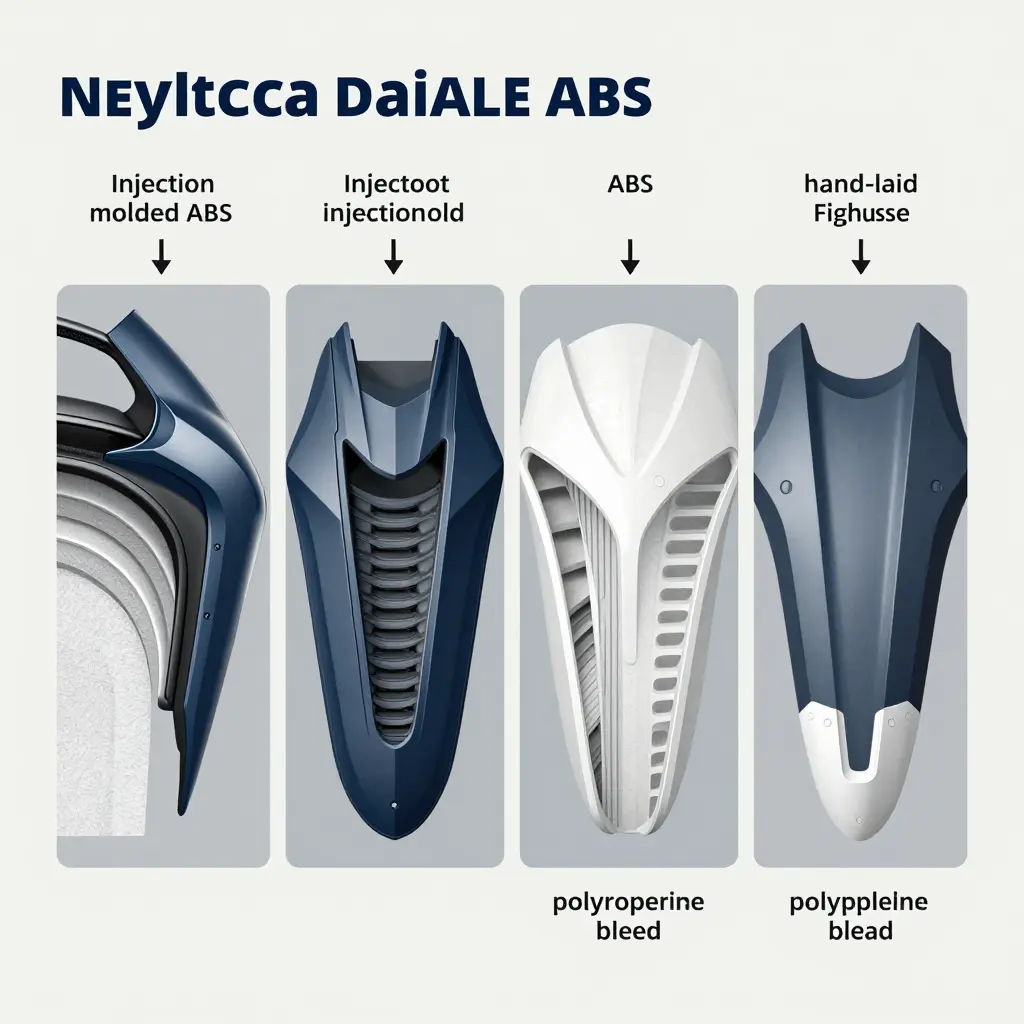
| Material | Typical wall thickness | Tab construction | Crack risk at tabs |
|---|---|---|---|
| OEM injection-molded ABS | 2.5 – 3.5 mm | Integral, ribbed, filleted | Low |
| Aftermarket injection-molded ABS | 1.8 – 2.2 mm | Integral, minimal ribbing | Medium to high |
| Hand-laid fiberglass | 3 – 5 mm (uneven) | Bonded-on or thin layup | High |
| Polypropylene blend | 2.5 – 3 mm | Integral, flexible | Low cracking, high deformation |
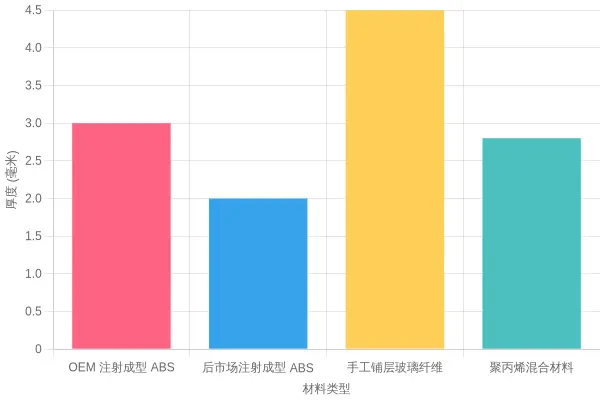
Material choice sets how brittle a tab is, wall thickness sets how much give it has, and tab molding decides where the stress actually goes. Get all three right and your fairings stay bolted on where they belong.
Why Aftermarket Fairings Crack at the Mounting Tabs
Pull a freshly installed aftermarket fairing and find a web of cracks around a bolt hole, and you are in familiar company. The tab is almost always the first part to go, and the mechanics are simple enough to diagnose on your own bike.
Thinner material and weak tab geometry
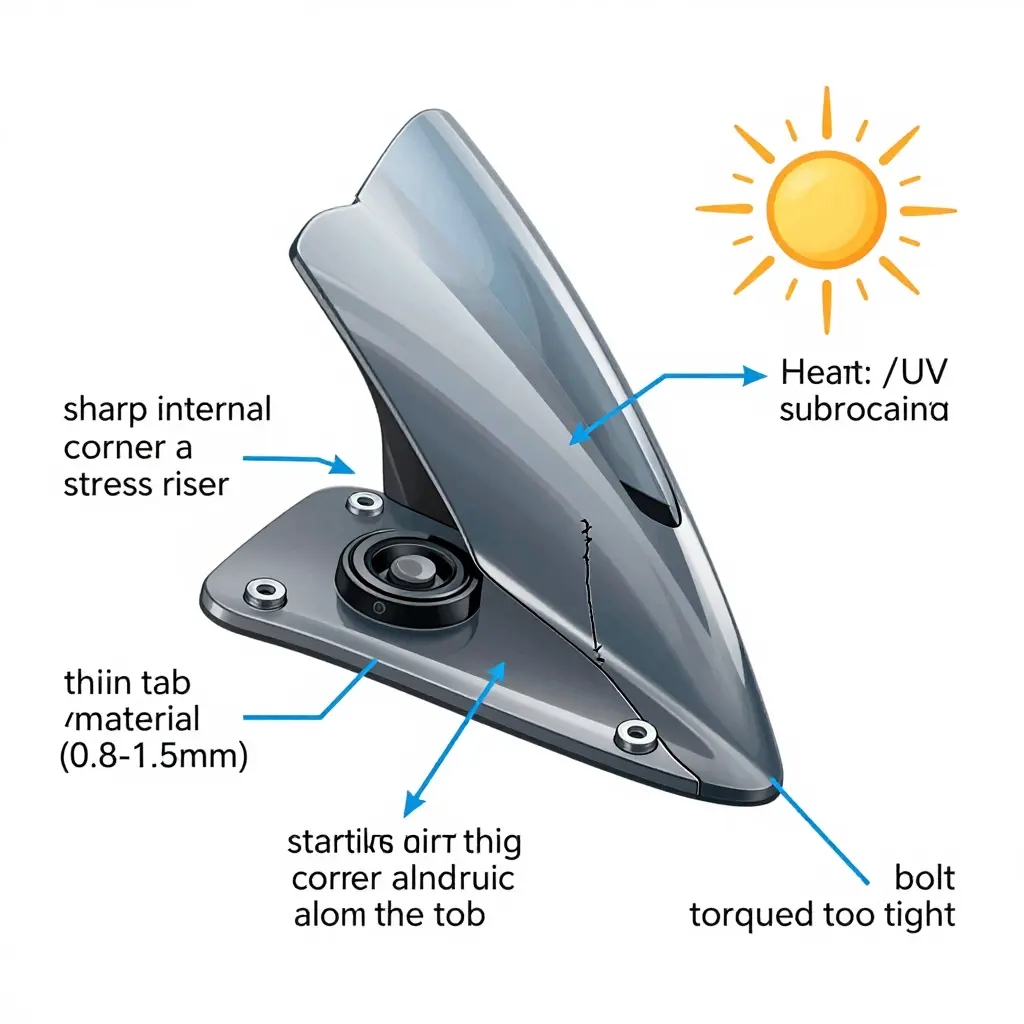
Aftermarket panels are usually molded from thinner ABS or fiberglass than OEM bodywork. Thinner walls flex more, and a thin tab squeezes all that movement into a tiny area. A shorter, narrower tab shape shortens the odds further.
Stress risers from sharp corners
Sharp internal corners are crack starters. Every 90-degree corner multiplies local stress, so the crack almost always begins exactly where the tab meets the panel. Run your fingernail along the inside edge: if you feel a hard, sharp corner, that is your first failure point.
Missing or hard rubber grommets
OEM setups use soft rubber well nuts and grommets to isolate the panel from the frame. Cheap kits often ship bare bolt holes or rock-hard plastic bushings, so every engine vibration travels straight into the tab instead of being absorbed.
Over-torquing during install
This is the number-one self-inflicted cause. Cranking a bolt down squashes the grommet, removes all flex, and pre-cracks the plastic. Most fairing bolts only need a light snug – think finger-tight plus a quarter turn, not a full lean on the ratchet.
Vibration fatigue and heat/UV degradation
Even a perfect install fights constant vibration, which slowly fatigues the plastic until it fails. Add heat from the engine and UV from the sun and the material turns brittle and chalky, so the same crack now happens in weeks instead of years.
Panel misalignment and repeated removal
If the holes do not line up, forcing the panel into place leaves it under permanent preload – a spring constantly pulling on the tab. And every time you remove and reinstall that panel, you flex the tab again, adding one more crack to the count.
How to diagnose your own fairing
Use this quick checklist before you blame the manufacturer:
| Symptom | Likely cause |
|---|---|
| Cracks start at a sharp corner | Stress riser from tab geometry |
| Crack runs along the tab root | Over-torquing or missing grommet |
| Crack appeared weeks after install | Vibration fatigue plus preload |
| Tab feels chalky and brittle | Heat and UV degradation |
| Cracks on multiple tabs at once | Panel misalignment |
Recognize your bike in that table and you are most of the way to a fix. Replacing the panel alone will not help; the cause has to be addressed or the next set of fairing mounting tabs fails the same way.
Tabs fail for a handful of predictable reasons. Watch for these:
- Over-torqued bolts crush the plastic around the mounting hole and start a stress crack the moment you tighten past spec.
- Hard, dried-out, or missing grommets remove the flex your tabs need, so every bump transfers straight into the plastic.
- Misaligned mounts force the panel to bend into place, leaving permanent tension that splits the tab over time.
- Vibration fatigue weakens the thin plastic at the tab root until a hairline crack grows into a full break.
- Heat from the engine or exhaust makes plastic brittle, so tabs crack far sooner than they should.
- Thin tab walls flex too much under load and leave almost no material to resist a crack once it starts.
- Improper shimming or missing spacers concentrate force on a single point instead of spreading it across the mount.
- Impact stress from drops, tip-overs, or road debris sends a shockwave that snaps weakened tabs clean off.
- Extra weight from heavy accessories or luggage overloads tabs that were never designed to carry it.
- Reusing stretched or stripped fasteners loosens the joint, letting the fairing rattle until the tab wears away.
Catch and correct these before install, and your aftermarket fairings will hold up far better on the road.
Why Do Aftermarket Fairing Tabs Really Crack?
No single villain snaps a fairing tab. The shares below are estimates drawn from repair reports and workshop experience rather than a controlled study, and they spread the blame almost evenly.
| Failure Cause | Estimated Share |
|---|---|
| Over-torque | 22% |
| Vibration fatigue | 20% |
| Impact damage | 18% |
| Misalignment / stress | 16% |
| Weak tab geometry | 14% |
| Heat / UV degradation | 10% |
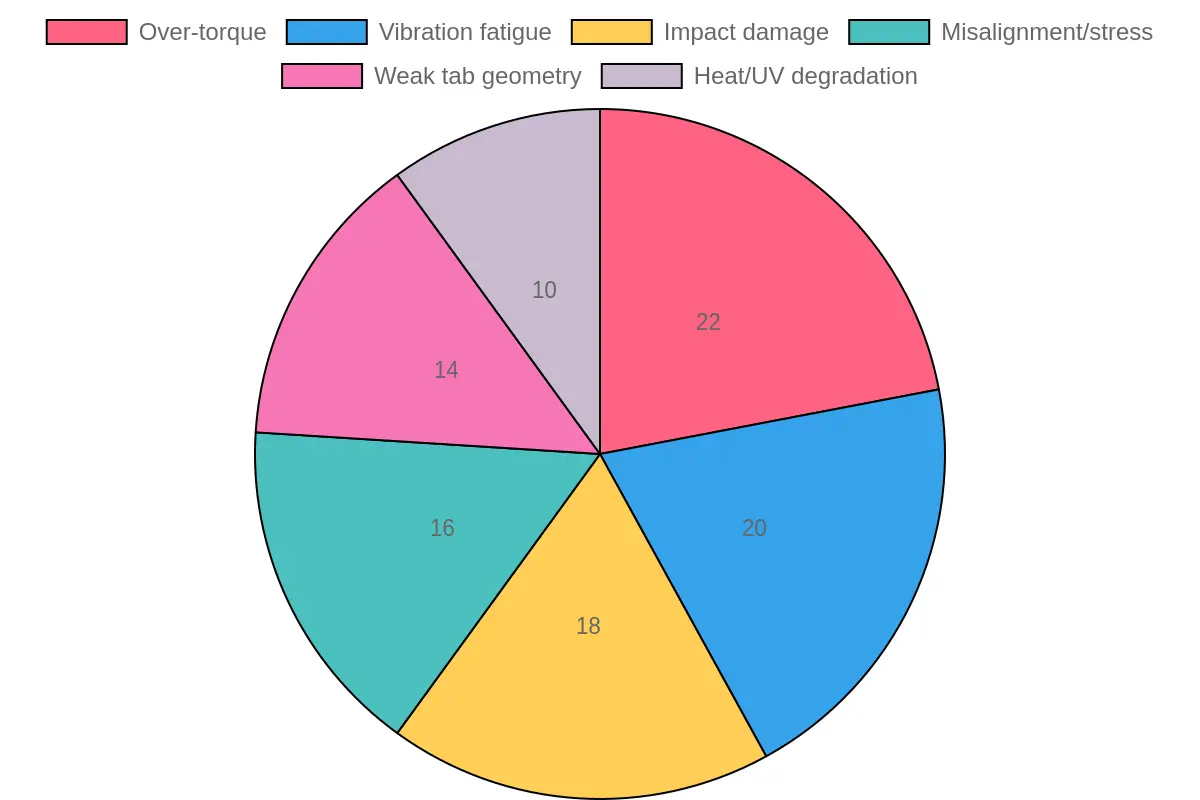
No single cause dominates the pie. Over-torque, vibration, misalignment, and weak tab geometry all take meaningful shares, so reinforcing the tabs and installing them correctly beats fixing one weak link.
The slices sit close together. Over-torque leads at 22 percent, barely ahead of vibration fatigue at 20 percent. Blaming your torque wrench alone misses that. A tab that is reinforced but bolted on crooked still fails, and a tab that is perfectly aligned but left thin and unreinforced cracks under vibration just as fast.
Treat cracking as a system problem: back the tabs with added material, keep bolt torque in spec, and make sure every panel lines up before you tighten anything down.
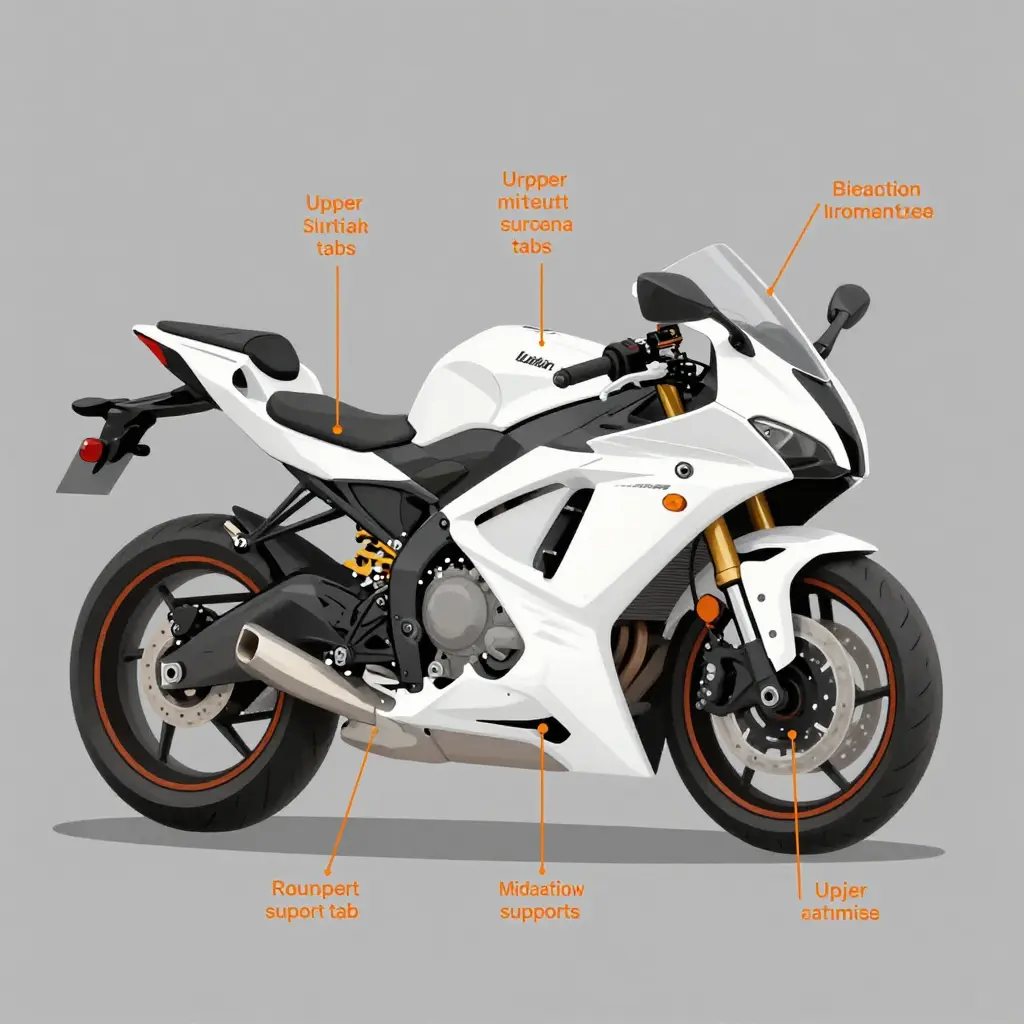
Where to Reinforce Fairing Mounting Tabs Before Install
Aftermarket motorcycle fairings can look factory-perfect on the outside, but the corners get cut at the mounting tabs. Those thin tabs soak up every vibration, heat cycle, and over-torqued bolt. To get more than one riding season out of a panel, reinforce the tabs before the first bolt goes in. The spots below crack first; the order is a rough priority, not a rule.
Upper Side Tabs
These sit near the top edge of the side panels, where the fairing meets the frame and fuel tank. Engine vibration and highway wind pressure keep them moving, and they carry the full weight of a large panel, so one rough bump can stress-crack them. Start here.
Nose and Instrument Surround Tabs
The nose and instrument surround tabs cradle the front cowl around the headlight and gauge cluster. They are thin, curved, and hit by direct airflow, so they crack from fatigue and even from a minor tip-over in the driveway. A failed nose tab can drop the entire front cowl onto the wheel, which is why they are worth the reinforcement.
Lower Cowl and Belly Pan Tabs
Belly pan and lower cowl tabs live closest to the road, taking debris, exhaust heat, and bottom-out impacts. They matter less for looks and more for protection: a cracked lower tab lets the panel drag, rattle, and tear.
Mid-Panel Support Tabs
Mid-panel support tabs bridge the upper and lower sections. They handle the most leverage because they sit mid-span, exactly where the panels flex the most. On cheap aftermarket motorcycle fairings, these are frequently the first tabs to snap.
Tail Section Tabs
Tail section tabs carry the seat cowl and rear fairings, and they take constant vibration plus the extra weight of luggage or a passenger. A small mounting surface and thin plastic make them crack quickly. Reinforcing them prevents a sagging, buzzing, loose-feeling tail.
Reinforcement Priority at a Glance
| Tab Location | Main Cause of Cracking | Priority |
|---|---|---|
| Upper side tabs | Panel weight and vibration | High |
| Nose and instrument surround | Airflow fatigue, tip-overs | High |
| Lower cowl and belly pan | Debris, heat, bottom-out | Medium-High |
| Mid-panel support | Flex leverage mid-span | High |
| Tail section | Vibration, luggage load | Medium |
The Bottom Line
You do not need to reinforce every tab to the same standard. Focus first on the high-flex, high-load points, add a small gusset or a metal backing washer behind each bolt, and snug – never crank – the fasteners. A few dollars of prep now saves you from hunting down cracks later.
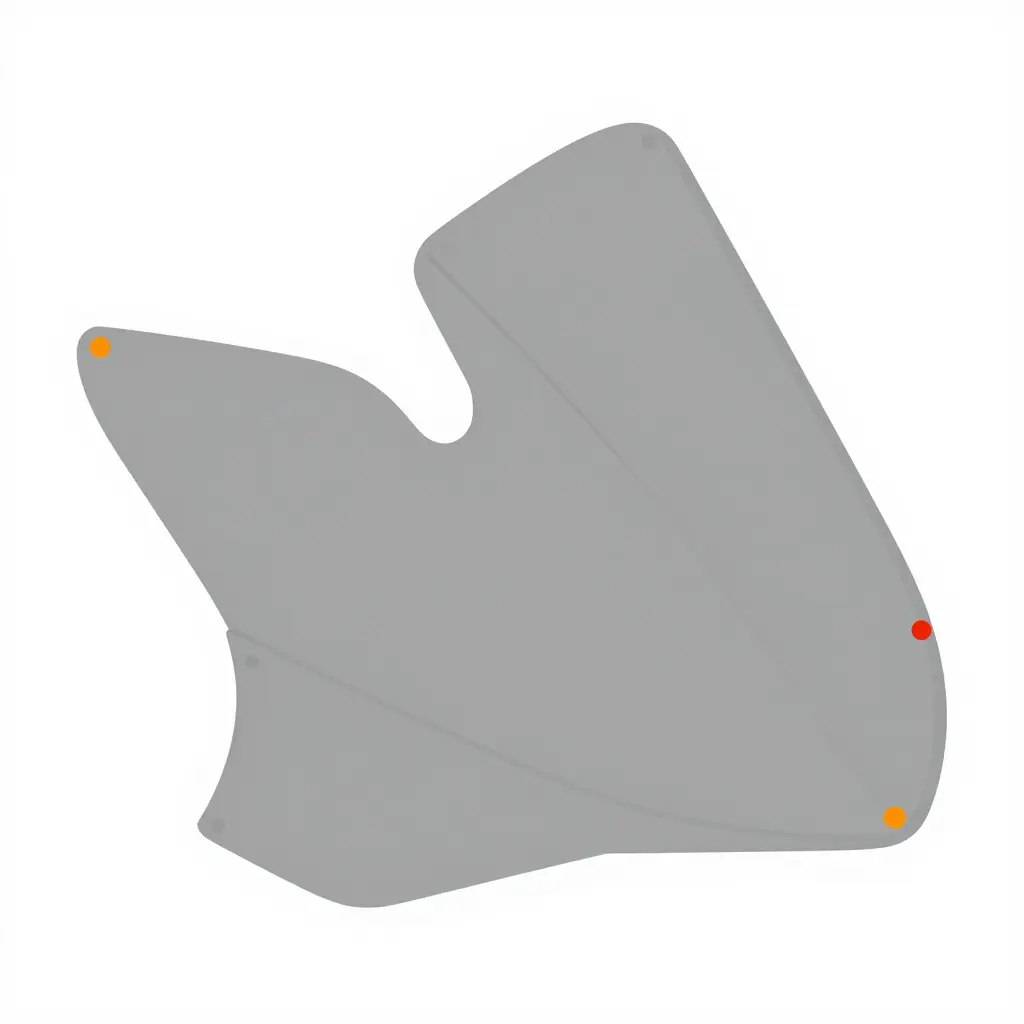
The markers show the tabs where stress concentrates and where aftermarket fairings most often crack. Those are the reinforcement points to address before install.
Practical Ways to Reinforce Fairing Mounting Tabs Before Install
Aftermarket fairings crack because the tabs carry every ounce of vibration and load. Spend an hour strengthening those weak points before your next fairing install and you will avoid the hairline cracks that show up a month later. These are the methods DIY mechanics actually use, with the trade-offs and the cases each one suits.
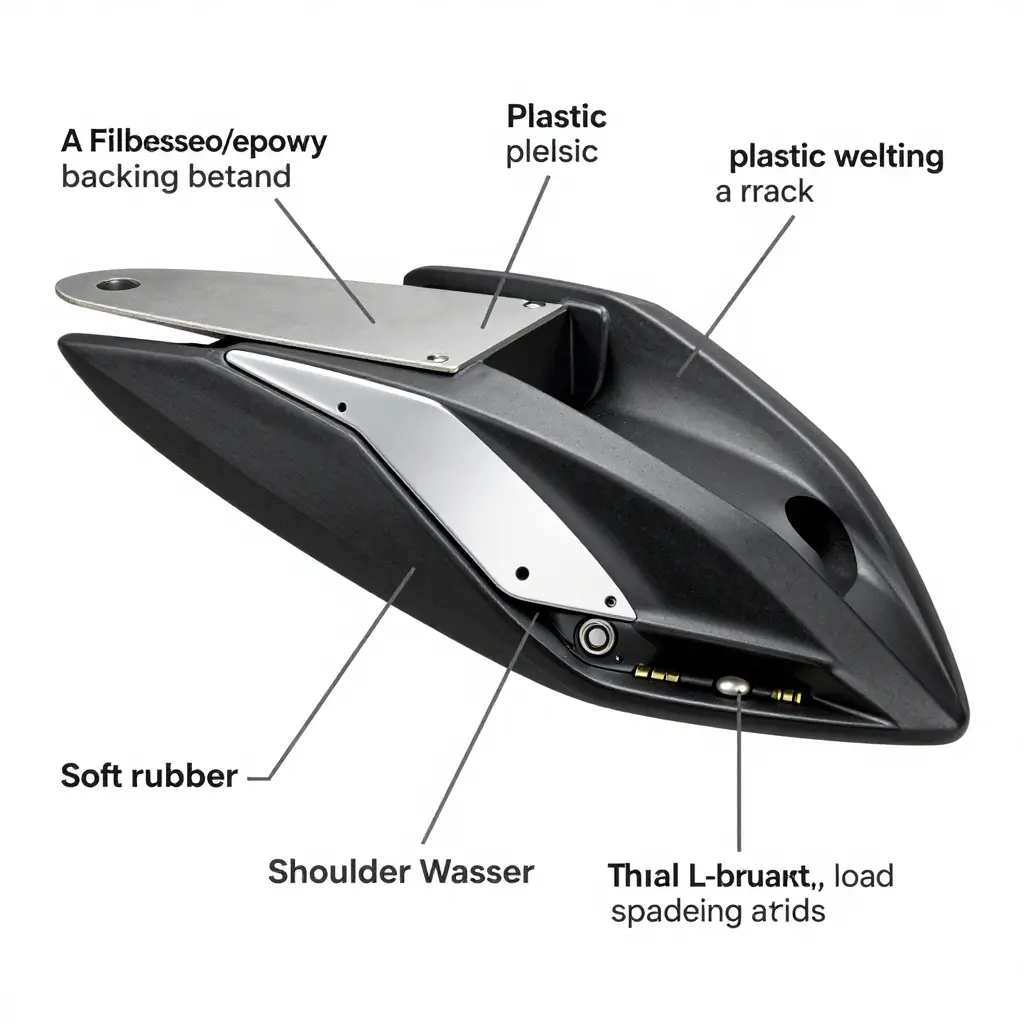
Fiberglass or Epoxy Backing
Lay a small fiberglass patch or a bead of epoxy on the back of the tab to add stiffness and thickness.
- Pros: cheap, strong, bonds well to many plastics.
- Cons: adds bulk, can turn brittle, needs cure time.
- Choose it when: tabs are intact but thin and you have room behind them.
Plastic Welding
Melt a donor piece of ABS into a cracked or thin tab with a soldering tip or plastic welder.
- Pros: repairs cracks and rebuilds missing material with little added weight.
- Cons: ugly, needs matching plastic and a steady hand.
- Choose it when: a tab is already cracked or snapped off.
Bonding Thin Aluminum or Plastic Plates
Glue a small aluminum or stiff plastic plate over the back of the tab to spread stress.
- Pros: very stiff, spreads load across the panel.
- Cons: adhesive must match materials; heat cycles weaken bonds.
- Choose it when: the tab sits near the seat or tank under high load.
Flexible Adhesive
Run a polyurethane or flexible sealer around the base of a healthy tab.
- Pros: absorbs vibration, easy, no drilling required.
- Cons: alone it will not fix a broken tab.
- Choose it when: used as a supplement on good tabs during any fairing install.
Soft Rubber Grommets and Shoulder Washers
Swap hard mounts for soft rubber grommets and add shoulder washers so bolts never crush the plastic.
- Pros: kills vibration transfer and prevents over-tightening.
- Cons: slight flex and a bit more parts hunting.
- Choose them: almost every time you reinforce fairing mounting tabs.
L-Brackets for Load Spreading
Add small L-brackets so force spreads across a wider panel area instead of one point.
- Pros: big stress reduction on the heaviest mounts.
- Cons: requires drilling and planning.
- Choose it when: a tab carries weight or sits near a stressed seam.
Quick Comparison Guide
| Method | Strength Gain | Effort | Best For |
|---|---|---|---|
| Fiberglass/epoxy backing | Medium-high | Medium | Thin, intact tabs |
| Plastic welding | Medium | Medium | Cracked or snapped tabs |
| Aluminum/plastic plate | High | Medium | High-stress mounts |
| Flexible adhesive | Low | Low | Supplement on healthy tabs |
| Rubber grommets | Medium | Low | Vibration control |
| Shoulder washers | Medium | Low | Preventing crush damage |
| L-brackets | High | High | Load spreading |
The Takeaway
Stack the cheap wins first. Fit rubber grommets and shoulder washers, run flexible adhesive around healthy tabs, then add welding, backing, or plates only where load and vibration demand it. Treat reinforcement as reliable parts and service support for your plastics, and your fairings will survive real-world roads far longer.
Which Reinforcement Method Gives You the Best Bang for Your Buck?
Before you drill, glue, or bolt anything onto a fragile mounting tab, it helps to see how the popular fixes compare. The chart plots each one against the two things a DIY mechanic cares about: how much durability it adds, and what it costs in time, money, and materials.
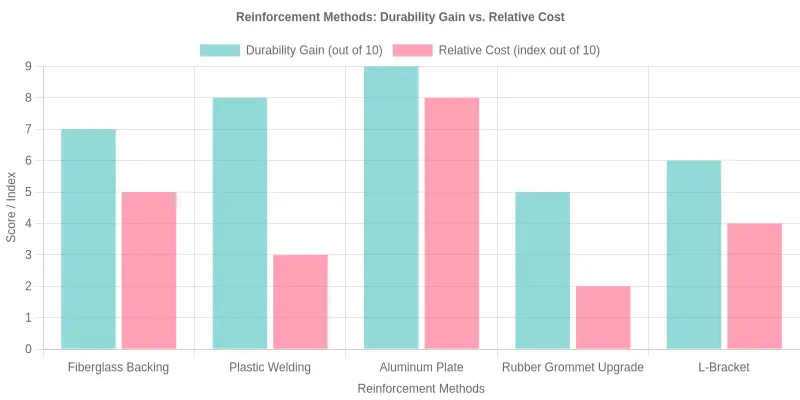
Caption: Plastic welding delivers the best strength-to-cost balance, boosting tab durability to an 8/10 for a low relative cost, while aluminum plate wins on raw strength (9/10) but at a steep price premium.
- Plastic welding is the sweet spot. It fuses new material into the tab itself, so you get high strength without paying for exotic hardware.
- Aluminum plate is the heavyweight champion on durability, but it is the priciest option and adds weight where you may not want it.
- Fiberglass backing sits comfortably in the middle, offering solid reinforcement at a moderate cost.
- L-brackets are a budget-friendly middle ground that spreads load without a huge investment.
- Rubber grommet upgrades are the cheapest fix, but they mainly reduce vibration fatigue rather than add real structural strength.
If you are planning a bigger build or prepping a fleet of bikes for harsh conditions, the same reliability mindset used in emergency preparedness planning applies: reinforce the weak points before they fail, not after.
Best Installation Practices That Prevent Fairing Tab Cracks
A fairing install succeeds or fails on the fastening, not the paint job. Those thin composite mounting points carry vibration, wind load, and heat cycles on every ride, so a few careful minutes during assembly decide whether a panel lasts for years or grows a spiderweb of cracks around the fairing mounting tabs. Work through the checklist a shop would use on any critical assembly.
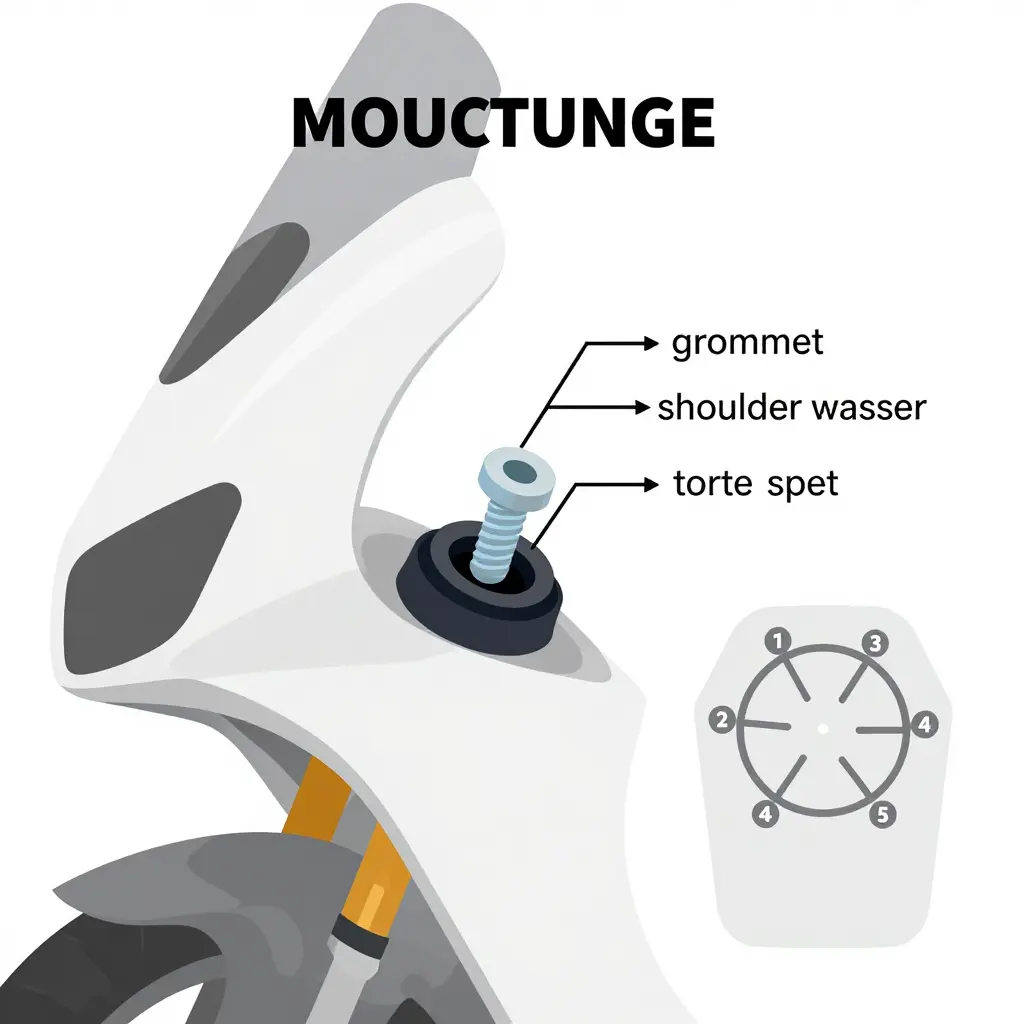
Torque It Right, Never by Feel
Small fairing bolts rarely need much torque. On M6 fasteners that thread into plastic clips, most models call for about 5 to 8 Nm (roughly 4 to 6 ft-lb). Confirm against your service manual and use a torque wrench. “Snug plus a little more” is exactly how tabs break.
Even Torquing Sequence
Tighten in a star or criss-cross pattern, in two or three light passes, instead of running around the panel once at full value. That spreads load evenly so no single tab gets yanked ahead of its neighbors.
Grommets and Shoulder Washers Every Time
Soft rubber grommets isolate metal fasteners from brittle composite, soaking up the vibration that otherwise fatigues a tab. Shoulder washers let the bolt bottom out on a metal sleeve, so the fastener cannot crush the plastic it passes through.
Thread Locker Instead of Over-Tightening
If a bolt keeps backing out, add medium-strength thread locker. Cranking it tighter to stop it loosening applies constant preload that eventually cracks the tab.
Warm Cold Fairings Before Flexing
Cold plastic is stiff and unforgiving. Let a chilled fairing reach room temperature, or gently warm it, before you flex it into position – especially in winter.
Align Panels Before Fastening
Test-fit every panel and line up the holes before driving a single bolt home. Fastening first and flexing later loads tabs in directions they were never designed for.
Never Force a Tab
If a tab will not line up, stop and find out why. A forced tab is already pre-stressed and will crack in service.
| Practice | What to Do | Why It Protects Tabs |
|---|---|---|
| Torque | Use a torque wrench to the manual spec | Prevents crushing and stress cracking |
| Sequence | Star pattern in light passes | Even load across all tabs |
| Grommets | Fit soft rubber at every tab | Absorbs vibration |
| Shoulder washers | Use shouldered hardware | Bolt cannot crush composite |
| Thread locker | Medium-strength compound | Holds without excess preload |
| Warm-up | Bring cold fairings to room temperature | Keeps plastic flexible |
| Alignment | Test-fit before final fastening | Removes bending stress |
| Fit-up | Do not force misaligned tabs | Avoids pre-loaded cracks |
Think Like a Fleet, Not a One-Time Job
Fleet operators have this part figured out: prevention beats repair. A fleet tracks inspection intervals and fastening torque because one loose part can sideline an entire operation, and the same discipline pays off on a fairing. For a look at how consistent inspection and proper fastening protect large equipment, see these maintenance-focused practices for reliable truck parts and service. Then re-check your fairing bolt torque and grommet condition after the first few rides, and add it to your seasonal maintenance routine.
Frequently Asked Questions About Fairing Mounting Tabs
Got a fairing that keeps cracking? These are the questions riders ask most about fairing mounting tabs, and how to fix them before your next install.
Why do aftermarket motorcycle fairings crack at the mounting tabs more than OEM parts?
Aftermarket motorcycle fairings are usually molded thinner and with less internal bracing than OEM panels, so vibration focuses on the mounting tabs. OEM fairings include molded ribs and tighter tolerances that spread load across the whole panel. Without that structure, cheaper aftermarket plastic flexes and fatigues exactly where the bolts clamp down.
Can I reinforce tabs after they already cracked?
Yes. A cracked tab can be repaired with plastic welding, epoxy, or a fiberglass backing patch. Align the tab first, then build up material on both sides so the load spreads instead of concentrating at the break. A repaired tab is rarely as strong as new, but a careful fix holds up fine for street riding.
What torque should I use on fairing bolts?
Most fairing bolts are small, and most use only 5 to 8 Nm (roughly 4 to 6 ft-lb) for M6 fasteners that thread into plastic clips. Over-tightening crushes the plastic and cracks the fairing mounting tabs almost instantly. Check your service manual and use a small torque wrench instead of guessing by feel.
Do rubber grommets really prevent cracking?
Yes. Rubber grommets and well nuts act as vibration isolators that soak up the constant buzzing which fatigues fairing mounting tabs. They also allow slight movement so rigid bolts do not drive stress straight into the plastic. When grommets are missing or swapped for hard metal washers, cracks appear far sooner.
Which reinforcement method is best for beginners?
For beginners, pre-drilled aluminum backing plates or fiberglass cloth with epoxy are the most forgiving options. They spread load evenly and are easier to get right than plastic welding, which takes practice to avoid brittle joints. Start with a simple plate-and-epoxy reinforcement around the fairing mounting tabs before you install anything.
Are reinforced fairings still safe at highway speed?
Yes. Properly reinforced fairings are safe at highway speed as long as the repair is structural and the panel sits flush against the frame. A weak or misaligned patch can vibrate loose, so recheck the bolts and tabs after your first few rides. If a tab feels loose or the panel flaps, pull it off before riding fast.
Where exactly should I reinforce a fairing before I install it?
Focus on the highest-load points: the upper nose tabs, the side tabs near engine heat, and any thin single-layer spots. Reinforcing the fairing mounting tabs before install prevents the flex that starts cracks later. When you replace panels, it also pays to buy from suppliers known for reliable parts and service rather than the cheapest listing.
Conclusion and Key Takeaways
Aftermarket motorcycle fairings crack at the mounting tabs for reasons that repeat across almost every brand. Factory plastics are molded with reinforced webbing and engineered flex that copies rarely match, and the tabs themselves concentrate every vibration, bolt-torque, and panel-stress load into a small, thin area. Add oversized bolt holes, uneven torque, or a snug fit that forces the panel to bend during installation, and the tabs become the first failure point. Overheating and UV exposure weaken the surrounding plastic even further, so a tab that survived the first season can suddenly tear on a cold morning start.
Before you bolt anything on, reinforce the load-bearing zones. Key locations include:
- Radiator shrouds and side fairing tabs – the highest-stress points on most sportbikes.
- Upper cowl and nose tabs, which carry wind load at speed.
- Tail and seat-unit mounts, frequently flexed by passengers and gear.
The reinforcement methods are simple and inexpensive. Add fiberglass or epoxy backing plates behind each tab, reinforce bolt holes with metal washers or bonded inserts, and use rubber grommets and standoffs to absorb vibration instead of transmitting it straight into the plastic. Heat-resistant sealant along weak seams helps too.
Installation habits matter just as much as reinforcement. Snug bolts evenly in a cross pattern, never over-torque, and let panels sit naturally rather than forcing alignment. A correct install plus pre-install reinforcement together can significantly extend the life of any aftermarket motorcycle fairings set.
If you would rather start with quality panels, Summit Fairings offers over 3,000 styles across almost all motorcycle models, prices 10-40% lower than other sites, and answers to any question within six hours. Visit summitfairings.com to protect your fairing mounting tabs before the first crack appears.