Why Material Identification Matters Before You Paint
Fairing plastic identification is the first decision that decides how a paint job ages. ABS is flexible and reacts with solvents; the brittle, fiberglass-filled panels on older or budget fairings behave almost nothing like it. Prime for the wrong one and you either flood a stiff panel with hot solvent that attacks the surface, or under-prime an ABS panel that then refuses to hold color. Both mistakes show up later as cracking along stress points, flaking edges, and fisheye where silicone or contaminants trapped in the wrong base coat repel the topcoat.
Getting it wrong costs more than a cosmetic redo. Every misidentification means stripping, sanding, and re-priming panels you had already finished, and that extra sanding round can burn through gel coat or thin the plastic until it warps under heat. Confirming the material first lets you match the primer, adhesion promoter, and flex additive to the substrate, so each coat actually bonds. A few minutes of testing before sanding saves hours of rework, whether you are a weekend enthusiast or a shop pro.
Judging Fairing Material by Eye: A Painter’s Visual Checklist
A fairing that flexes is almost always ABS. A panel that cracks at the first sign of stress is usually a brittle thermoset or a cheap composite. You do not need lab equipment to tell them apart, just decent light, a clean rag, and a few minutes of careful looking. Here is what to check.
Surface Texture and Feel
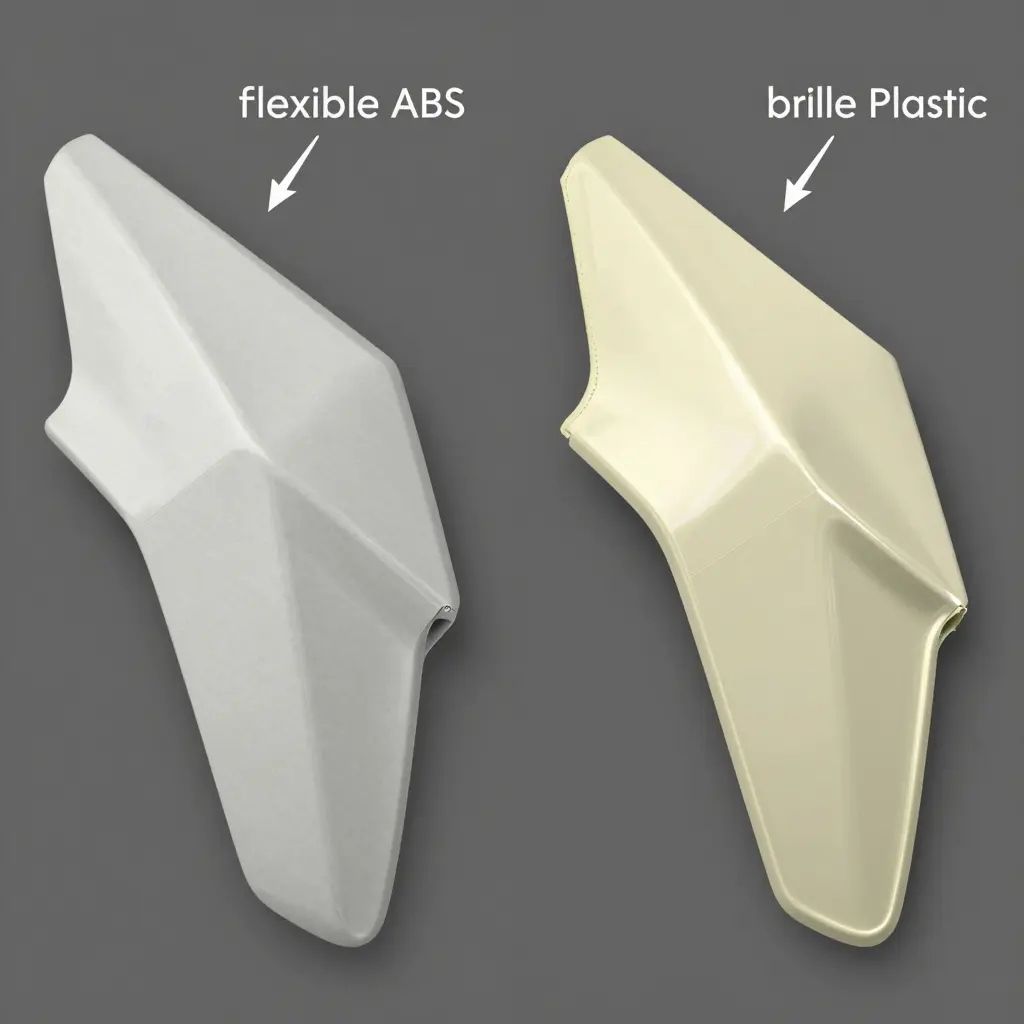
Run your fingertips across a bare or lightly painted surface. ABS carries a faintly satin, slightly waxy finish with a subtle “orange peel” grain that shows up under strong light. Brittle plastics often look smoother and glassier, almost like ceramic, and they feel cold and hard rather than faintly yielding.
Gloss Level
Hold the panel at an angle to a window or shop light. ABS reflects light in a soft, diffuse spread, so highlights look gentle and wide. Brittle material throws back a sharp, mirror-like glint that breaks up quickly, a hint that the resin is stiff and unforgiving.
Mold Seam Appearance
Study the seam lines where the part was released from its mold. Flexible ABS usually leaves a thin, rounded, slightly irregular seam that blends into the surrounding panel. Brittle plastics typically show a crisp, pronounced ridge with a hard, angular edge.
Edge Thickness
Examine an exposed edge, ideally behind a mounting tab or hidden lip. ABS is usually thick and consistent, and it bends a little before it would ever snap. Brittle panels often taper thin and unevenly, and the material can look chalky where it was cut or broken.
Color of the Raw Interior
Flip the fairing over and inspect an unpainted interior surface. Genuine ABS is uniform all the way through, often off-white, cream, or light gray and sometimes black, with no cloudiness. Brittle plastic frequently shows a darker, muddy yellow, brownish, or mottled tint, sometimes with swirl marks, which usually means the resin has aged and lost its flexibility. If you are sourcing replacements, starting with reliable parts services for island riders helps you begin with trustworthy material.
ABS Plastic vs Brittle Plastic: At-a-Glance Comparison
The table below sorts the common fairing materials by how each one feels, flexes, sounds, and reacts to solvent. Read it before you touch a spray gun.
| Material | Surface Feel | Flex Response | Sound When Tapped | Solvent Reaction | Painting Readiness |
|---|---|---|---|---|---|
| ABS plastic | Semi-gloss, slightly waxy, warm to touch | Bends, then springs back to shape | Dull thud with low resonance | Softens and goes tacky; acetone dissolves it | Excellent; flexible primer bonds well |
| Polypropylene (PP) | Waxy, slick, faintly oily | Very flexible; deforms under light pressure | Dead, muted thump | Highly solvent-resistant; shrugs off acetone | Poor; needs flame or plasma treatment plus adhesion promoter |
| Fiberglass (FRP) | Hard, glassy, cool to touch | Rigid; little flex before it cracks | Sharp, high-pitched ring | Resin softens with strong solvents | Good; sand, prime, and watch the gelcoat |
| Polystyrene (brittle) | Hard, dry, chalky | Little to no flex; cracks instead of bending | Sharp, brittle click | Dissolves or crazes quickly | Fair to poor; cracks under stress |
| PVC (brittle) | Smooth, hard, cool | Stiff; snaps rather than bends | Crisp, snapping tap | Softens and swells quickly | Poor; solvent paints can attack it |
How to read it: A panel that springs back and taps with a dull thud is almost certainly ABS. One that feels waxy, resists solvent, or cracks instead of flexing is a brittle plastic, so adjust your prep and primer choices accordingly.
The Flex and Bend Test: A Hands-On Way to Identify ABS
A flex and bend test costs nothing and takes seconds, and it tells you more about a fairing than most tools in the shop. It reveals whether you are working with forgiving ABS or a brittle panel that will crater the first time you handle it.
Step 1: Pick the right spot. Find a thin exposed edge, an inner lip, or an unused mounting tab. Avoid visible outer panels and painted surfaces, since flexing fresh paint can crack an otherwise good finish.
Step 2: Flex slowly and deliberately. Grip the tab or edge and bend it gently through a small arc, no more than about 20 to 30 degrees. Do not snap it. ABS should bow like stiff rubber and hold its shape while you apply pressure.
Step 3: Read the release. This is the heart of the ABS plastic fairing test. A genuine ABS part springs back slowly and gradually, sometimes leaving faint whitening along the bend line, and that slow return means the material is ductile. A sharp, sudden crack or a shattered edge means the plastic is brittle, most likely an aged, UV-degraded panel or a stiff thermoset composite. Polypropylene is a separate case: it flexes too, but it is a poor paint substrate for other reasons, so judge it by the solvent test rather than the bend test.
Step 4: Watch the temperature. Temperature changes the reading more than most painters expect. Warm a stiff panel with a heat gun or a sunny afternoon and it flexes more readily. Chill it in cold weather and even real ABS becomes stiff and crack-prone, so always test at room temperature before you judge the material.
Repeat on two or three spots, because a single repaired corner can mislead you. Learn the difference between a forgiving flex and a fatal snap, and you will paint confidently instead of gambling on the wrong plastic. If you are sourcing replacement panels for a fleet or a single bike, quality parts suppliers make that decision easier.
The Tap-and-Listen Test: Your First Quick Diagnosis
One field trick takes five seconds, needs nothing beyond your own hand, and can save you from a paint job that fails the moment someone leans on a panel. Curve a knuckle and rap a fairing panel sharply, or use a small plastic mallet and tap a few spots along the same piece. You are listening for resonance, not hitting hard enough to leave a mark. Light, confident taps only.
On genuine ABS plastic, the sound is dull and low. It lands as a soft, flexible thud that dies quickly and stays close to your knuckles. The panel feels compliant under your hand, as if it is absorbing energy rather than transmitting it. That muted response comes from ABS being a rubbery, impact-tolerant blend that soaks up vibration instead of ringing.
On brittle plastic — the cheap, aging, or fiberglass-reinforced shells that crack if you look at them wrong — the story is completely different. The same tap produces a sharp, dry, high-pitched crack that rings out and travels along the surface. It sounds tight, thin, and almost glassy, and you may feel a faint vibration run away from the strike point.
That difference matters. A dull thud usually means the panel can flex with minor impacts and take normal sanding stress. A high-pitched crack warns you that the material is unforgiving, easy to fracture at bolt holes, and likely to spiderweb the instant it takes a knock.
Tap several panels: front cowl, side fairings, belly pan. If most answers come back dull and low, you are almost certainly working with flexible ABS. If they ring out sharp and dry, treat that plastic as brittle and plan your prep, fillers, and handling accordingly.
The Solvent Spot Test: Read Your Plastic Before You Paint
The solvent spot test is a fast, low-tech way to separate true ABS from brittle alternatives before a single drop of primer hits the surface. It works because ABS reacts to strong solvents and most brittle plastics simply do not.
How the Spot Test Works
Start by finding an inconspicuous interior area: a hidden mounting tab, the unpainted back of a panel, or a raw edge that never sees sunlight. Dip a cotton swab into acetone (or another strong solvent you have on hand) and apply a single drop to that hidden zone. Wait ten to twenty seconds, then touch the spot lightly with your fingertip.
Reading the Results
On genuine ABS, the surface softens, swells, and turns noticeably tacky. That reaction is exactly why the acetone test ABS plastic method earns its reputation, and it is also why ABS welds so cleanly during repairs. Brittle plastics behave very differently: they tend to resist the drop, cloud over, or sit there unchanged, with no softening at all.
A tacky, slightly gummy spot means ABS. A resistant or cloudy surface points to a brittle plastic that needs different prep and paint chemistry.
Safe Testing Rules
Safety comes down to one firm rule: test on hidden zones only. Never dab solvent on a visible exterior panel, no matter how confident you feel. Even a successful test leaves a permanent mark on painted surfaces, and a failed one can dull or etch the finish you were trying to protect.
- Always work outdoors or in a well-ventilated area.
- Wear nitrile gloves and eye protection.
- Use the smallest possible drop.
- Wipe clean and let the test spot fully dry before continuing.
| Plastic Type | Reaction to Acetone | What It Means |
|---|---|---|
| ABS | Softens, swells, turns tacky | Repairable and paintable with ABS-friendly products |
| Polypropylene | Resists, barely reacts | Needs specialized adhesion promoters |
| Plain fiberglass | Clouds or dulls | Prep with sanding and primer, not solvent welding |
Run the test before you commit to a paint system, and you will avoid the guesswork that ruins otherwise perfect fairing jobs.
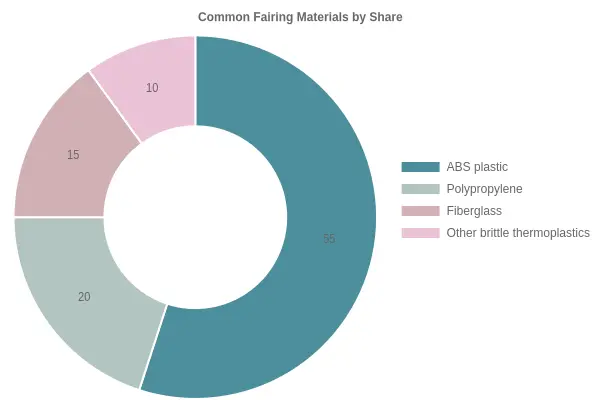
Figure: Common Fairing Materials by Share – This doughnut chart shows the typical makeup of motorcycle fairings by material. ABS plastic dominates the category at roughly 55% of fairings, followed by polypropylene at 20%, fiberglass at 15%, and other brittle thermoplastics at 10%. The shares are representative estimates for comparison and quick orientation, not exact production data.
That distribution explains why so many fairings behave like ABS when you flex, tap, or sand them, and why a hard, snap-prone piece is more likely an outlier than the norm. When in doubt, test before you paint.
Field-Test Mistakes That Fool Painters
Even experienced painters get tripped up when they trust their eyes and hands instead of running a couple of simple checks. These are the blunders that lead to cracked, peeling, or flaking paint jobs:
- Testing on painted surfaces is the biggest trap. The paint you are judging is not the fairing underneath, so you never learn how the raw ABS actually behaves once a solvent touches it.
- Judging by temperature alone fools painters constantly. A fairing that feels stiff on a winter morning may simply be chilled, not genuinely brittle.
- Mistaking primer for base material happens more than anyone admits. Scrape a hidden edge and confirm whether you are looking at a factory primer coat or the bare plastic beneath it.
- Skipping the solvent spot test leaves you guessing. A few drops of acetone on an inconspicuous spot will tell you within seconds whether the material dissolves or resists.
- A single tap test proves nothing. One tap on a thick section says little about thin, aged plastic hiding along the fairing’s mounting tabs.
- Ignoring how the part flexes under gentle pressure is a classic error. Forcing a curve that cracks instead of bending is your clearest warning sign of brittle plastic.
- Overlooking repaired cracks misleads many painters. A previous owner’s filler or epoxy can make a damaged panel feel solid while the surrounding plastic quietly fails underneath.
- Trusting color or gloss as a material clue wastes time. Paint, clear coat, and aftermarket wraps hide the true surface and tell you nothing about the substrate.
When you need dependable replacement panels or fairing components for your build, sourcing from a trusted truck parts specialist serving islanders saves you from wrestling with mystery plastics. Slow down, run the spot test, flex a hidden edge, and confirm the substrate before you pick up a spray gun.
The Decision Path: Identify the Fairing Material Before You Paint
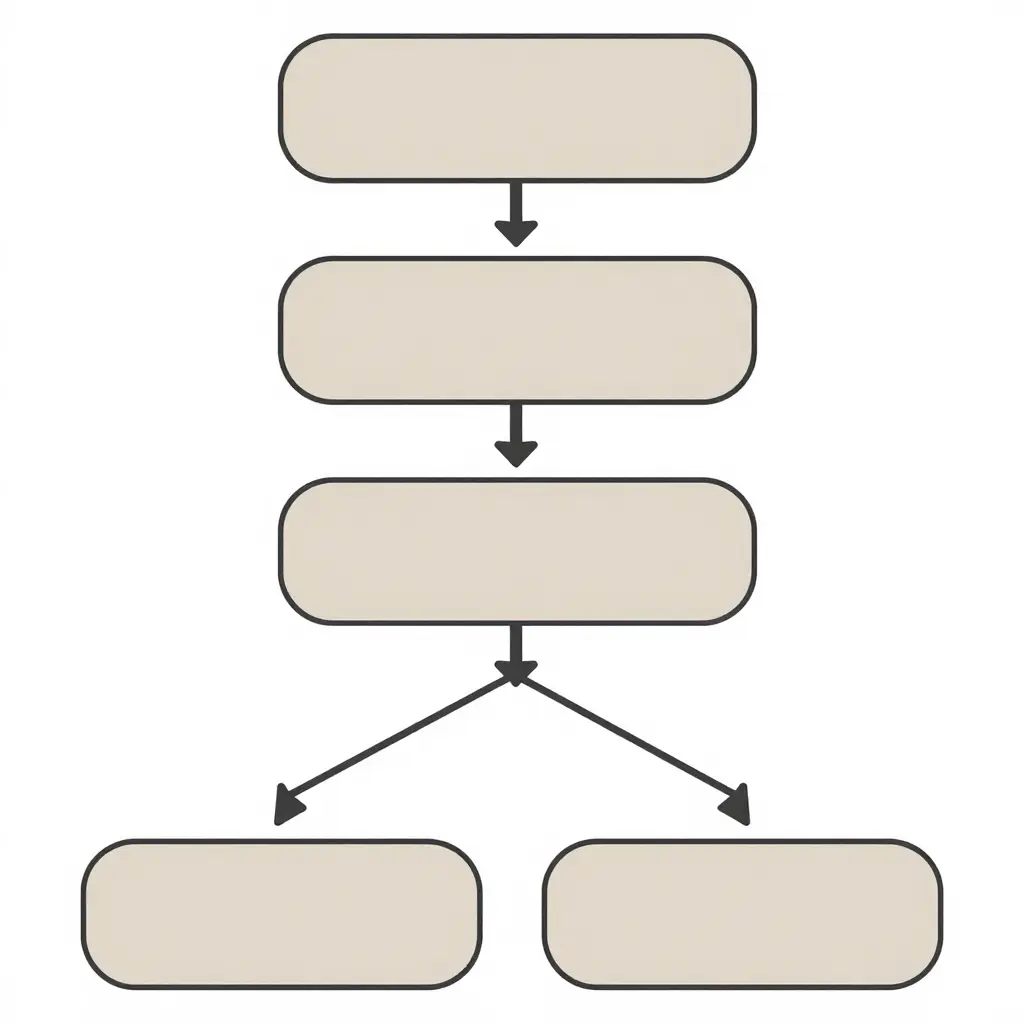
The flowchart above maps the order of checks to run before any sanding, priming, or topcoat touches your fairing. Working front to back keeps you from wasting money on the wrong paint system or, worse, watching a freshly sprayed panel craze and crack a week later.
Here is how the path reads:
- Step one – Visual inspection: Look for stress whitening, hairline cracks, and the flex behavior of the part in hand. This first pass filters out the obvious candidates without spending a dime on chemicals.
- Step two – The flex test: Gently flex a hidden edge or an inside tab. An ABS-style panel bends and springs back; a brittle panel snaps, splinters, or shows whitening at the bend line.
- Step three – The solvent spot test: Apply a drop of acetone to a concealed area. It softens and bites into ABS but does little to most brittle plastics. This is the confirmation step that settles the argument.
- Two outcome branches: The path ends in two results, a part that behaves like ABS (solvent-reactive, flexible, repairable with standard plastic welding and flexible primers) or a part that behaves like brittle plastic (needs different prep and a more forgiving coating strategy).
Run the steps in order and you get a clean answer every time, which is what protects a costly paint job. If a damaged panel turns out to be beyond a repaint and you need reliable parts and repair services, line up replacements early so the job does not stall mid-project.
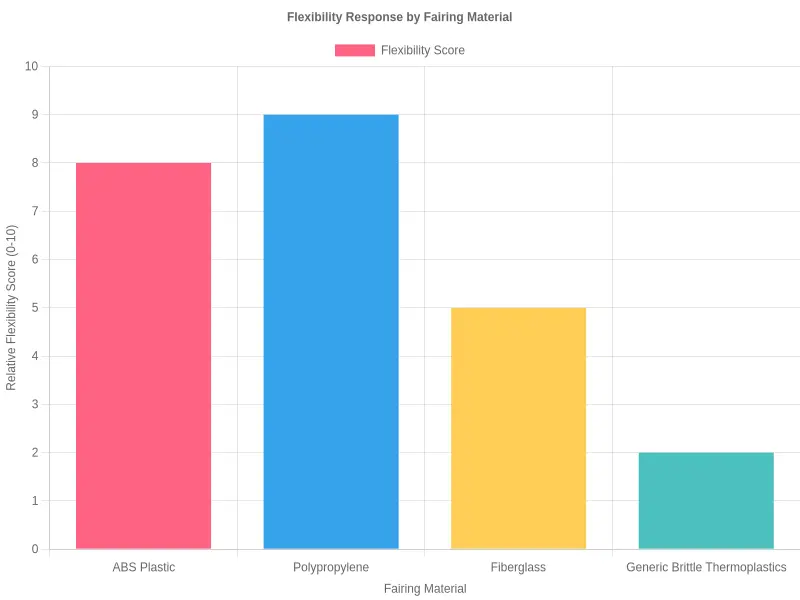
Figure: The x-axis groups four common fairing materials, while the y-axis plots a relative flexibility score from 0 to 10. Higher bars mean the material bends further before it cracks. ABS plastic and polypropylene score high (8 and 9), fiberglass sits mid-range (5), and generic brittle thermoplastics score lowest (2), exactly the stiff, snap-prone stock you want to identify before spraying on paint.
Painting Preparation: Let the Plastic Decide Your Process
Once you have identified whether your fairing is ABS or a brittle plastic, your prep work changes. The material dictates your chemicals, your tools, and your patience. Treat every panel the same way and you will watch good paint fail on the wrong substrate.
Prepping ABS Fairings
ABS is the forgiving one, but it still has rules.
Cleaning. Start with a thorough degrease. Warm water and a mild detergent lift dirt and mold-release agents, then a wax-and-grease remover wipes away silicones that quietly kill adhesion. Let the part dry completely before moving on.
Scuffing. ABS needs “tooth.” Hit it with 320- to 400-grit sandpaper or a grey scuff pad, working into curves, edges, and recesses. You do not need to sand to bare plastic everywhere, just to a uniformly dull surface that gives the primer something to grip.
Adhesion promoter. This is the step people skip and regret. A dedicated plastic adhesion promoter creates a chemical bridge between the flexible substrate and your primer. One thin, even coat, then let it flash.
Flexible primer. ABS moves with heat and vibration, so use a flexible primer or a primer with a flex additive. Rigid primers crack. Two light coats beat one heavy coat every time.
Handling Brittle Plastics
Brittle plastics crack instead of bending, and that changes everything.
Bonding repairs. Structural cracks and missing tabs need a proper bonding repair. V-groove the crack, then use a plastic welder or a two-part epoxy formulated for plastics. Staples or a reinforcement mesh add strength across the break.
Crack sealing. After the repair cures, seal remaining hairline cracks with a flexible filler or a thin cyanoacrylate wicked into the gap. Sand smooth once fully cured.
Primer choices. Brittle plastics often demand a different primer chemistry. Match the primer to the substrate, apply light coats, and never bake the part in direct sun to speed drying. Heat is the enemy here.
Reduce Risk Before You Start Sanding
The cheapest prep is the one you never have to do. Sourcing correctly manufactured replacement fairings cuts your prep risk dramatically: fresh, properly molded panels mean fewer cracks, fewer surprises, and less chance of a paint job failing six months down the road. If you need dependable parts and service support while sorting out a repair, reputable parts and service resources can save you hours in the booth.
Match your prep to your plastic, and your paint will reward you.
Frequently Asked Questions
Can I paint over brittle plastic without identifying it?
Not if you want the finish to last. Painting over unidentified brittle plastic is one of the fastest ways to get a job back for a redo. Aged or UV-damaged panels, polypropylene, fiberglass, and cheap aftermarket plastics do not respond to the same primers and flex agents that ABS plastic needs. Adhesion fails, hairline cracks creep under the clear coat, and a minor parking-lot bump turns into a spiderweb of fractures. Identify the substrate first, or you are gambling with your labor and your reputation.
Does ABS plastic always flex?
No, and this trips up plenty of painters. Fresh, undamaged ABS plastic is known for its flex, which is why it dominates motorcycle fairing manufacturing. But ABS behaves differently depending on temperature, age, and how it has been stressed. A fairing that has spent years baking in the sun can lose that give and turn stiff and chalky. So “flexible means ABS” is a useful hint, not a guarantee. Pair the bend test with a chemical check before you commit.
Is the acetone test safe on a fairing?
With care, yes. A single drop of acetone on an inconspicuous spot will soften and slightly dissolve true ABS plastic, which is the telltale sign. On brittle plastic or fiberglass, it usually just sits there or evaporates. Use a tiny amount in a hidden area, wipe it off quickly, and never soak a painted surface. Acetone is aggressive, and used sloppily it can mar a good panel, so treat it as a spot test, not a bath.
Can painted fairings still be tested?
Yes, but you have to get through the coating first. Paint, primer, and clear coat block the chemical and physical clues underneath. Sand a small hidden spot down to bare material, inside a mounting tab or behind a turn signal, before running your bend or acetone check. Testing a painted surface as-is gives you a false reading and leads to the wrong prep strategy.
How do I confirm material on a fully assembled bike?
Hunt for bare edges and hidden zones. Pull a seat, remove a side cover, or peek inside the inner motorcycle fairing where the factory left uncoated material. Stamped markings like “ABS,” “PP,” or “PC/ABS” are the gold standard. If you find nothing, flex a hidden tab gently and note whether it springs back or cracks. When you need replacement panels, working with reliable parts and service partners helps ensure you are repairing with material that matches.
What if I get the identification wrong?
Do not panic, just adjust. If a panel turns out to be brittle plastic after you have already primed it, strip back to bare material and switch to a dedicated adhesion promoter made for that substrate. The mistake only becomes permanent if you keep layering product onto an incompatible surface. When in doubt, slow down, test again, and let the material tell you what it needs.
Wrapping It Up: Know the Material, Then Source It Right
Telling whether a motorcycle fairing is genuine ABS or brittle, low-grade plastic comes down to a handful of reliable checks. Tap the panel and listen for a dull thud versus a sharp crack. Flex a hidden edge and watch for white stress marks or a sudden snap. Apply a drop of acetone to an inconspicuous spot: real ABS softens and gets tacky, while cheap plastic resists or fogs. Look inside for reinforcement ribs, molded part numbers, and consistent thickness, since brittle panels usually feel thin and hollow. Any single test can mislead you, so stack several before you commit.
Once you know the material, the next step is choosing the right replacement. That is where correctly manufactured fairings earn their keep. A properly molded ABS or polypropylene panel behaves exactly the way your paint and prep expect, so you skip the guesswork that comes from sanding, priming, and hoping a mystery substrate will hold up. A quality replacement removes the “will this crack, bubble, or flake?” gamble before your first coat of primer ever hits the surface.
When you are ready to source, summitfairings.com makes the decision simple. The shop carries over 3,000 styles covering almost every motorcycle model on the road, all priced 10-40% less than other sites, and their team answers your questions within six hours. That combination of range, price, and fast support means you spend less time hunting and more time finishing. And if you also need dependable motorcycle parts logistics or heavy-duty parts sourcing and service support, our partners keep your build moving from order to install. Match your material to a fairing that is manufactured to last, and the paint will do the rest.